Saturday, September 5, 2009

How to Hack An Admin Account On Windows XP

How to Hack An Admin Account On Windows XP

By megerdin

1. Reboot
2. Before the windows logo comes up press F11 (Just start clicking it over and over again until the windows logo comes up.)
3. Just sit and let it do it’s thing and when the login screen comes up click on the Admin icon (It was a picture of a pink flower on her account)
4. After it logs in go to control panel
5. Then go to User Accounts
6. either make an old, non, admin account an admin account or create a new one
6a. If you wanna make a new account just click Create a New Account > Pick a username > Set setting as an admin
6b. If you wanna change an account to an admin: Click the account > Change the Account Type > the Select Admin

7. Then thats it reboot and it’s all done. Make sure not to reboot in safe mode though!


How do I get admin privileges using cmd/command prompt in WIN XP?

How do I get admin privileges using cmd/command prompt in WIN XP?

runas /user:mymachine\administrator cmd


Saturday, August 15, 2009

Disable USB Removable Mass Storage Device Drive Access in Windows


It’s possible to simply disable USB ports support in PC BIOS in order to prevent and forbid computer user from using USB removable flash drive or mass storage device (portable hard disk drive) to copy and transfer data and files. However, disabling USB ports totally also shutdown the ability for system to use USB based keyboard, mouse, webcam, printer, scanner and etc, which has become a common connectivity norm in modern computer.

As a workaround, use the following registry hack to stop USB Mass Storage Device drivers from starting when the system boots up.

  1. Run Registry Editor (regedit).
  2. Navigate to the following registry key:

    HKEY_LOCAL_MACHINE\SYSTEM\CurrentControlSet\Services\UsbStor

  3. In the right pane, double click on the Start value name.
  4. Change the value data to 4 to disable the removable USB mass storage device drive access.

    Disable USB Mass Storage Device Drive Access

  5. To revert and re-enable the drive access for removable USB mass storage device driver, change back the value data for Start to its original default of 3.

The change will take effect immediately to block any USB mass storage device such as USB flash drive, USB key and portable harddisk from been used in the system, while still allowing hardware components to work properly via USB connection. The hack works in most Windows operating system such as Windows Vista, XP, Windows Server 2008, 2003 and 2000.

For user who dare not to modify the registry manually, simply download the following registration entries file to enable or disable the USB drive. Extract the downloaded content in .ZIP format, and then double click on the .REG file to open and apply or merge the registry values to system.


http://www.mydigitallife.info/2008/06/26/disable-usb-removable-mass-storage-device-drive-access-in-windows/


Tuesday, June 16, 2009

How to OpenSSH server in windows Xp

Download latest version from here, choose Binary Installer Releases
Quick install steps :

Time for configuration, click Start -> Run, put cmd then click OK


C:\Program Files\OpenSSH\bin>mkgroup -l >> ..\etc\group

C:\Program Files\OpenSSH\bin>mkpasswd -l -uadministrator >> ..\etc\passwd

C:\Program Files\OpenSSH\bin>net start opensshd

The OpenSSH Server service is starting.

The OpenSSH Server service was started successfully

Wednesday, May 27, 2009

How to re-enable windows .chm viewer

Sometimes it may be disable to view windows help. an error message may appear like ...

mk:@MSITStore:C:\WiNDOWS\Help\netcfg.chm::/how_to_enable_component.html


then what do u do ??
Just run this following command in Start>>Run>>

regsvr32 itss

and press enter. you are done

Error 720: A connection to the remote computer could not be established. You might need to change the network settings for this connection.

The solution I used to solve this is basically one developed by
"nortel", but I put all the steps together in one place to make it
easier for others. Here's the procedure:

Instructions (for WinXP) to fix:
Error 720: A connection to the remote computer could not
be established. You might need to change the network settings
for this connection.

Note that a key sympton of this problem is that the modem
connects and then disconnects just after trying to register
the computer on the remote network.

These instructions were comp
Publish Post
iled from a couple of sources:

http://www.tek-tips.com/viewthread.cfm?qid=1225579

and

http://support.microsoft.com/default.aspx?scid=kb;en-us;810979.

Note that you can't uninstall TCP/IP in XP, which is why I
wrote up this version, but the procedure is basically the same.

Step 1: Uninstall the WAN Miniport (IP) and WAN Miniport (pptp)

MPORTANT: This procedure contains information about modifying the registry.
Before you modify the registry, make sure to back it up and make sure that
you understand how to restore the registry if a problem occurs. For
information
about how to back up, restore, and edit the registry, click the following
article
number to view the article in the Microsoft Knowledge Base: 256986
(http://support.microsoft.com/kb/256986/EN-US/) Description of the Microsoft
Windows Registry

SYMPTOMS
When you try to use a dial-up connection to connect to your Internet Service
Provider (ISP), you may receive the following error message during the
"Registering your computer on the network" portion of the connection
agreement:
Error 720 - the connection attempt failed because your computer and the
remote computer could not agree on PPP control protocol.
Additionally, when you view the devices in Device Manager, you may notice a
yellow exclamation mark (!) over the icon for the WAN Miniport IP (#2) device.
Back to the top Back to the top

CAUSE
This issue may occur if the TCP/IP protocol has become unbound from the
dial-up adapter, or if a conflict is created when a second WAN Miniport IP
device driver loads.
Back to the top Back to the top

RESOLUTION
To resolve this issue, uninstall the WAN Miniport IP and PPTP devices.
To do so, follow these steps:

1. Right-click My Computer, and then click Properties.

2. Click the Hardware tab, and then click Device Manager.

3. On the View menu, click Show hidden devices.

4. Under Network adapters, you will see WAN Miniport IP
devices. If a WAN Miniport IP device is listed, continue to the
following step. If no WAN Miniport IP device is listed, go directly
to step 16.

5. Click Start, click Run, type regedit in the Open box, and then click OK.

WARNING: If you use Registry Editor incorrectly, you may cause serious
problems that may require you to reinstall your operating system. Microsoft
cannot guarantee that you can solve problems that result from using Registry
Editor incorrectly. Use Registry Editor at your own risk.

6. Locate the following registry subkey:
HKEY_LOCAL_MACHINE\SYSTEM\CurrentControlSet\Control\Class\{4D36E972-E325-11CE-BFC1-08002BE10318}

7. On the Registry menu, click Export Registry File, type backup-key in
the File name box, and then click Save.

Note You can restore the changes that you make to this registry key. To do
so, double-click the backup-key.reg file that you saved.

8. Click each of the registry subkeys under this key, and then view the Data
column of the DriverDesc value to determine which of the subkeys
corresponds to WAN Miniport (IP). For example, the 0005 subkey.

9. Right-click the subkey whose DriverDesc value data is WAN Miniport (IP) or
WAN Minport (PPTP); (for example, right-click 0005), and then click
Delete. Click Yes to confirm that you want to delete the key.

10. Quit Registry Editor.

11. Right-click My Computer, and then click Properties.

12. Click the Hardware tab, and then click Device Manager.

13. On the View menu, click Show hidden devices.

14. Under Network adapters, right-click WAN Miniport (IP) and then click
Uninstall. Click OK to confirm that you want to remove this device.

15. Repeat for the WAN Miniport (PPTP).


Step 2: Reinstall the WAN Miniports

1. Find netrasa.inf in c:\windows\inf

2. Make a copy of the file and name it netrasa.inf.save

3. Open the orignal copy of netrasa.inf and place a semicolon
in front of the line that starts "Excludefromselect=\" and
and continue with all follwing lines and then end with
"MS_NdisWanNbfIn,MS_NdisWanNbfOut" under the [ControlFlags]
section. (all lines between)

Step 3:

1. Start a Add new hardware session (from Control Panel) and choose
that the hardware is already installed. Choose to "Add New Hardware"
and then select "Network Adapters" followed by "Microsoft" and then
both the PPTP and the IP Wan miniport one at a time.
(NO need to reboot between these steps)

2. After you finish both then reboot.

3. Select Start -> Run and type: netsh int ip reset c:\resetlog.txt

(For details, see http://support.microsoft.com/kb/299357)

4. Reboot and try your connection.


This worked for me and has worked for others.

Note that if you don't want to uninstall the two WAN Miniport devices,
you can disable them in the Hardware Manager and then proceed with
the reinstall as described above. This has the advantage of being more
easily reversible.

Tuesday, April 28, 2009

How to install Microsoft Core Fonts

Microsoft Core Fonts

These fonts need to be built from the web so you will build an rpm package based on a SPEC file.

su -c 'yum install wget rpmdevtools rpmbuild cabextract ttmkfdir'
  • Then create the rpmdev directory
rpmdev-setuptree
  • Switch to your SPECS directory that you created in the previous step.
cd ~/rpmbuild/SPECS/
  • Download the spec file.
wget http://dl.atrpms.net/all/chkfontpath-1.10.1-2.fc9.x86_64.rpm
wget http://corefonts.sourceforge.net/msttcorefonts-2.0-1.spec
  • run the following command to build the rpm
rpmbuild -bb msttcorefonts-2.0-1.spec
  • Move to where the msttcorefonts rpm was created
cd ~/rpmbuild/RPMS/noarch/
  • Download and install the msttcorefonts and dependencies
su -c 'rpm -ivh chkfontpath-1.10.1-2.fc9.x86_64.rpm'
su -c 'rpm -ivh msttcorefonts-2.0-1.noarch.rpm'
  • Then run the following code to restart the font server.
su -c '/sbin/service xfs reload'

Or

su -c '/etc/init.d/xfs reload'

Repair Windows XP in 8 Commanmds

Boot PC with a Boot able XP CD.
Go 2 Repair mode and then Run the following command

* C:CD ..
* C:ATTRIB -H C:\\BOOT.INI
* C:ATTRIB -S C:\\BOOT.INI
* C:ATTRIB -R C:\\BOOT.INI
* C:DEL BOOT.INI
* C: BOOTCFG /Rebuild
y
Windows XP Professional
/fastdetect /noexecute=optin


* C: CHKDSK /R /F
* C: FIXBOOT
Y
Restart PC

Saturday, April 11, 2009

How to restore msconfig utilities in wondows?

How to restore msconfig utilities in wondows?

msconfig+This operation has been cancelled due to restrictions in effect on this computer please contact your systems adminisrator+windows XP

Way-01:

Click Start, Run and enter REGEDIT Go to:

HKEY_CURRENT_USER\Software\Microsoft\Windows\CurrentVersion\Policies\Explorer

Look in the right pane for a value called DisallowRun. If it exists, double click it and set it to 0 (zero).

Additionally, there should be a DisallowRun subkey. In this key is the list of applications that you're not allowed to run.

Way-02:

Unless it is truly missing, the file is at: X:\WINDOWS\PCHealth\HelpCtr\Binaries\msconfig.exe (replace the X with your drive letter upon which Windows is installed).

C. If you truly have to completely re-install XP, first you must either:

(1) Intergrate (slipstream) SP2 with XP onto one CD. I recommend you do this with a free little program named "AutoStreamer". Just type "slipstreaming XP" and/or "AutoStreamer" into Google and you find plenty of sites with instructions/comments.

(2) Uninstall SP2, install XP, then reinstall SP2.

Gene K


4 Ways to Solve: Task Manager has been disabled by your administrator

4 Ways to Solve: Task Manager has been disabled by your administrator

Task manager is a very strong utility tool for Windows users. You can see the processes, prioritize them, end inactive or non-responding processes and many more things. But suddenly one day you get this error message like,

Task Manager has been disabled by your administrator

Don't worry. There are not 1 but 4 ways to deal with this problem.

Solution-1

Click Start, Run and type this command exactly as given below:

Better copy and paste it to be exact.

Solution- 2:

* Click Start, Run and type Regedit.exe

* Navigate to the following branch:

HKEY_CURRENT_USER \ Software \ Microsoft \ Windows \ CurrentVersion \ Policies\ System

* In the right-pane, delete the value named DisableTaskMgr

* Close Regedit.exe

Solution- 3: (recommended for XP users)

* Click Start, Run, type gpedit.msc and click OK.

* Navigate to this branch:

User Configuration / Administrative Templates / System / Ctrl+Alt+Delete Options / Remove Task Manager

* Double-click the Remove Task Manager option.

* Set the policy to Not Configured.


How to Solve: Registry Editing Has Been Disabled By Your Administrator?

How to Solve: Registry Editing Has Been Disabled By Your Administrator?


Do you get this message while running Windows?

Registry Editing Has Been Disabled By Your Administrator

if yes then you need not to worry. There are two solutions for this.

Solution-1:
* Go to Start -> Run –> type gpedit.msc

* In the left hand menu, go to User Config –> Administrative Templated –> System.

* Now In the right hand pane, select “Prevent access to registry editing tools”. It will probably be not configured or enabled. If it’s enabled, disable it and if it’s not configured, first enable it, apply settings and then disable it. Most probably the settings have been applied instantly. If not, then run gpupdate in command prompt to apply the group policies.


Solution-2:
This is a very simple trick.

* Go to Start -> Run -> type

REG add HKCU\Software\Microsoft\Windows\CurrentVersion\Policies\System /v DisableRegistryTools /t REG_DWORD /d 0 /f

* Press Enter and you are done!

<

How to restore missing windows systems .dll file?

How to restore missing windows systems .dll file?

FIRST run the System File Checker [SFC]. To do it: Start/All Programs/Accessories/Command Prompt/type "sfc /scannow" (leave out the quotation marks AND be certain a space precedes the forward slash). This tool will check for all Windows OS files and will replace/repair any found to be missing or corrupted utilizing your OS CD.

Monday, March 23, 2009

Five quick detox tips foe Linux

Five quick detox tips

  1. Customise your distro Revisor, bundled with the latest Fedora release, is perfect for creating your own customised distribution and putting it on to a USB stick. A customised distribution will enable you to fine tune your own requirements as well as helping to keep your data to a minimum.
  2. Rescue is at hand If you run into problems restoring from a backup or reinstalling the operating system, have something such as SystemRescueCd close to hand for troubleshooting. This can help with LVM and booting as well as getting at your backup archives and even old data.
  3. Ghost a working install Use Partimage to make a ghost copy of a freshly installed and configured Linux installation. This can save you a great deal of time if you just need to quickly reinstall your system and it's perfect as a backup medium too.
  4. Remote storage Store your transferable data on an alternate drive. You can then wipe your Linux installation knowing that your important data is still safe. If it's network-attached storage, there's the added advantage of universal access.
  5. Use symlinks Symbolically link directories you know you want to keep using ln -s source destination. If the destination is on a remote drive, you only need to restore the symbolic links on a fresh installation to get access to your old data. Links will be saved as part of a backup, which is handy.

Wednesday, March 18, 2009

Creating Seamless Virtual Machine with Virtualbox 1.6

Creating Seamless Virtual Machine with Virtualbox 1.6


Virtualbox 1.6, which was released in May 2, was the first major release since Sun took over virtualbox. All I can say is Wow!! This is perhaps the single biggest, most important open source release which will change the face of how computers are used for years to come. Hell this is even bigger than the release of hardy heron (IMO), and Ubuntu 8.04 LTS was a very important release.

One single feature of virtualbox, seamless, will make some major software completely redundant in coming years. Don’t get me wrong, seamless was possible with virtualbox since the last release before 1.6; but it was buggy, not a part of the features and needed a decent amount of hack and workaround to even get it to work. So seamless was possible, but never like this. With virtualbox 1.6 seamless is truly effortless, and well integrated, and super fast.

I think because of seamless virtual machine, the use of software like wine (compatibility layer for running Windows programs on linux environment), Cygwin (Linux-like environment for Windows), or a commercial product for a virtual machine like vmware, will be redundant. For developer like me, who constantly have to switch back and forth between linux and windows environment, this is god-send.

For a list of new features, bug fixes, check out the official changelog: http://www.virtualbox.org/wiki/Changelog

So lets get going and see how to install and setup seamless virtual machine.

Installing Linux guest in Windows host and configuring seamless mode

Step 1: Setting up Virtual Machine

Download and install virtual box for windows over here.

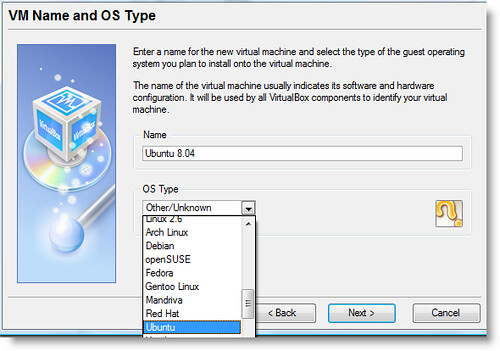
Create a new virtual machine but clicking “New”:

Choose a name for the virtual machine, choose the distro you would like to install. For this example, I chose Ubuntu.

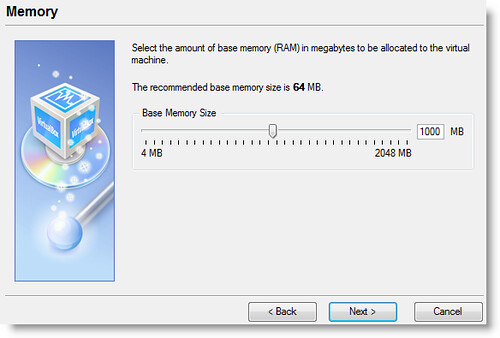
Next we have to select the base memory. Here I would like to say a few words. Virtual machine are not for all systems, with the decreasing price of ever so powerful dual and quad-core systems, it would be a good investment for you to truly experience the integration of seamless virtual machine. Memory is also very important, I am showing this example on a quad-core with 3Gb of memory.

I am using 1GB for my virtual machine.

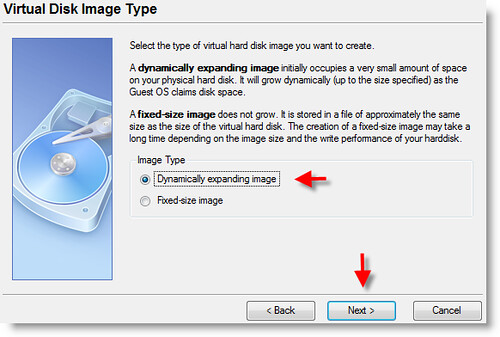
Next we will create a virtual dynamic disk for the virtual machine:

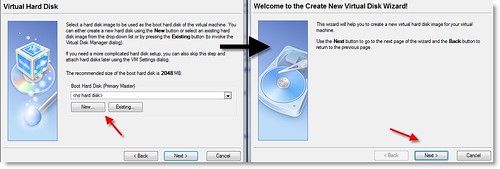
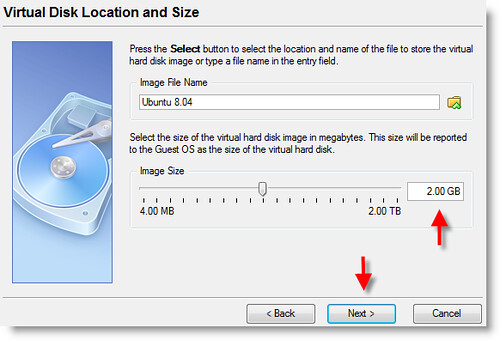
The rest of the selection process is pretty straight forward:

I choose 2GB because that all I need for this example, you can choose whatever amount you like.

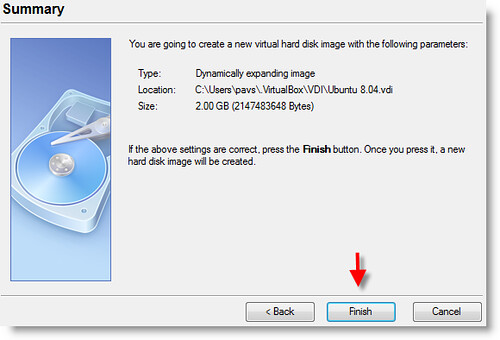
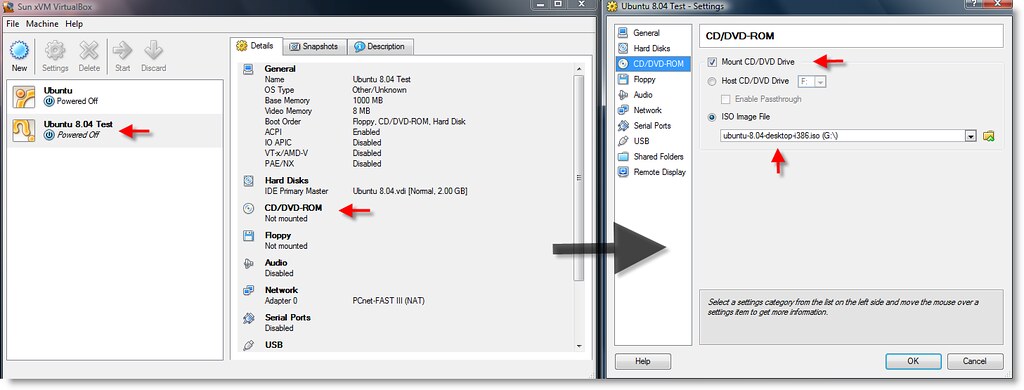
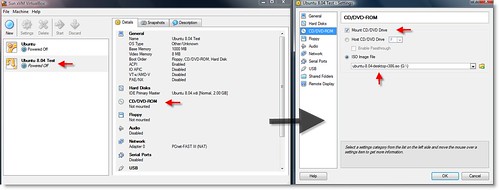
After creating virtual disk, it should give you summary and that should end the wizard. Before you go on and start the virtual machine you have to assign the Ubuntu image file you should have downloaded by now before instalation. Just mount your ISO image file to the virtual machine cd drive:

(click for larger image)

Go ahead start the virtual machine by clicking start on top of the menu. Now the OS installation (Ubuntu here) should start. After you are done with installing the OS, go to the next section to configure seamless feature.

Step 2: Setting up Seamless

Before you restart after installation, make sure you unmount the OS image file, the same way you mounted it.

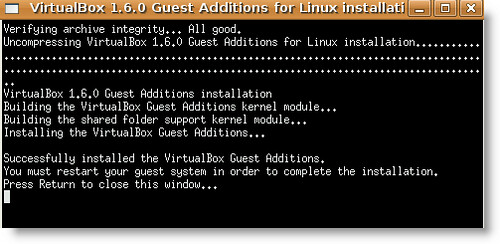
Now we will install “Guest additions” (Device –> Install Guest additions), which will add many of the features needed to enable seamless and other features of the guest OS.

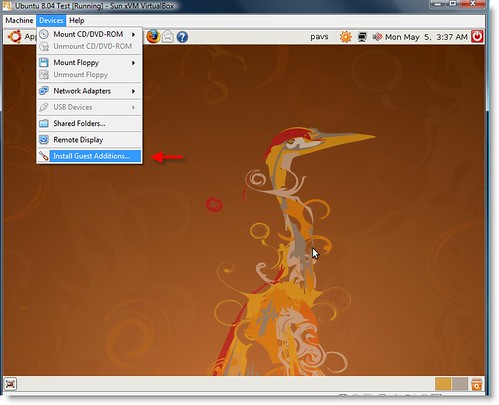
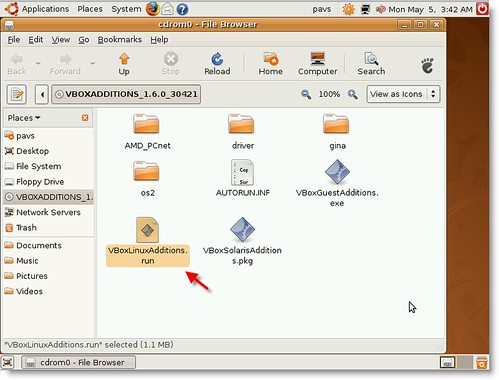
Double-click or run the file VboxLinuxAdditions.run as root, which will install guest additions.

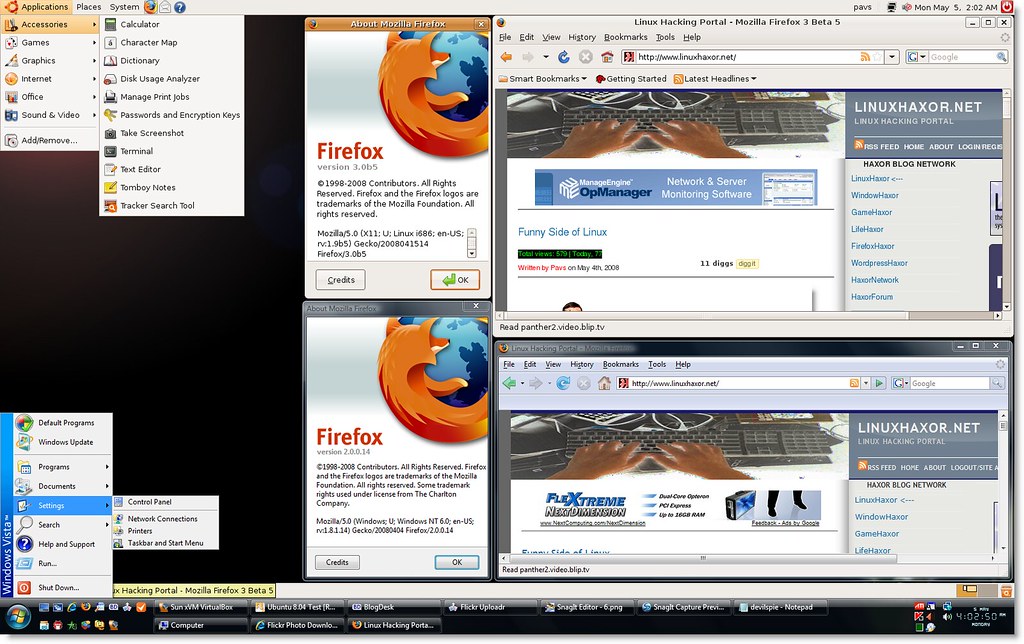
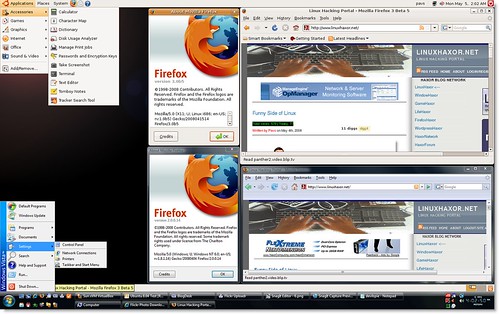
Restart guest ubuntu OS, go to Machine –> Seamless mode. Now you should have two OS running side by side, with the ability to copy&paste any information, without having to press “host” key to switch back and front from guest OS.

This is how my Desktop looks like now, very cool stuff. :)


(click for larger image)

I hope you found this article usefull as much as I have enjoyed making it.

If you liked this article, please share it on del.icio.us, StumbleUpon or Digg. I’d appreciate it. :)

5 Free Apps to Clone Your Hard Drive

5 Free Apps to Clone Your Hard Drive

Hard drive prices are so low now that it really makes sense to use an imaging program. That way you've got a perfectly cloned backup of your system exactly the way you have it configured in case of a crash, which is much more convenient than reinstalling Windows, activating, and loading all your applications all over again.

Here are four great apps to get the job done - without spending a dime!

DriveImage XML. Runtime Software has never placed too much importance on looks, and it's for a very good reason. Their software works really, really well. DriveImage was the first software I used to create images within Windows. Scheduled backups can be created with the Windows Task Scheduler and command line switches. DriveImage is free for private, home use only. Yes, Macrium Reflect does the same thing and looks nicer, but it's $39.99.

For a straight-up, drive-to-drive clone, you can use Runtime's Shadow Copy. Shadow copy is free for everyone, not just home users.

Like DriveImage, XXClone runs in Windows. It has an extremely simple interface, and gives you the option to copy volume ID to your destination and make it bootable. The interface also provides quick access to the Windows disk manager, in case you need to perform some quick drive tasks prior to cloning. XXClone is free for personal, private use.


Those who, like me, prefer imaging from the command prompt should try EaseUs Disk Copy. It's interface looks a bit like a Ghost/Partition Magic mashup. It's very easy to use, handles all types of internal and external drives, and will even work with dynamic disks. DiskCopy is free for everyone.

Linux buffs will urge you to try PING, which I mention in 5 Apps for a Painless Reformat. Ping can clone drives, create bootable recovery media, back up BIOS data, reset passwords, and clean your cat's litter box. Ok, not really, but it's got more tricks up its sleeve than any other free cloning solution.

Did I miss your imaging app of choice? Comment it!

Tuesday, March 17, 2009

How to remove rememberd password In Windows XP


How to remove rememberd password In Windows XP:

Windows XP does not offer a very easy way to review or remove the saved passwords though. If you follow the steps below though you can access a graphical interface to add, remove or edit the saved passwords on a given system.

1. Click Start and select Run

2. In the Open field type "rundll32.exe keymgr.dll, KRShowKeyMgr"

3. Once the Stored Usernames and Passwords interface opens you can select any of the entries and select Properties to view the existing information

4. To remove a saved password you can select one of the entries and select Remove. A confirmation screen will appear. Click on OK and the account will be removed

5. You can add additional saved passwords as well by clicking on the Add button and entering the appropriate information

6. Repeat the steps above as needed to add, remove or edit saved passwords

7. When you are done using the interface click the Close button

Monday, March 9, 2009

Free computer ebooks

For Computer Ebooks

http://knowfree.net/
http://www.netbks.com/
http://www.freescience.info/Computer...ence.php?id=49
http://appsapps.com/ebooks/
http://vasilius.com/ebook/
http://freebooks.pcriot.com/index.php
http://infosec.pku.edu.cn/~liumiao/books/
http://www.elib.hbi.ir/computer/comp-index.htm
http://www.codeidol.com/
http://ftp.mgts.by/pub/docs/
http://www.51cnnet.net/
http://www.linuxinet.com/category/fr...ux-ebooks.html
http://www.ebook-x.com/
http://books-pdf.blogspot.com/
http://www.technolib.net/

http://www.innoebooks.net/
http://www.btebook.com
http://www.freeebooks.info/
http://allfree.fermanaziz.com/ebooks...amming-ebooks/
http://forums.techarena.in/ebooks/
http://ebook9999.blogspot.com/
http://www.b213.net/
http://www.rapidfind.org/upload/foru...er=desc&page=4
http://www.itstudy8.org/
http://www.betah.co.il/
http://www.yourlib.com/
http://www.freebooksource.com/
http://www.ebooksboard.com/
http://www.free-ebooks-junction.com/
http://www.witguides.com/
http://www.allbestbooks.com/
http://www.ebookshare.net/
http://ebooksbay.org/
http://www.1clickebooks.com/dotnet.aspx
http://www.share-ebooks.com/node
ftp://194.44.214.3/pub/e-books/
ftp://82.208.164.19/
ftp://202.96.64.144/pub/books/
http://free-ebook-collection.blogspo...rch/label/java
http://www.flazx.com/category108.php

For Ebooks Other Than IT Field

http://www.mediclib.com/
http://manybooks.net/categories/
http://www.yourbooklib.com/
http://www.medschoolchat.com/eBooks.html
http://medicalbooks4everyone.blogspo...abel/Pathology
http://ebook9999.blogspot.com/2007/0...cal-books.html
http://www.doctorebook.com/
http://www.freebooks4doctors.com/

Saturday, January 10, 2009

Turn Off Autoplay for Program CDs

Turn Off Autoplay for Program CDs

How can you stop Windows XP from launching program CDs?

  • Click Start, click Run, type GPEDIT.MSC to open Group Policy in the Microsoft Management Console.
  • Double-click Computer Configuration, double-click Administrative templates, double-click System, and then click Turnoff autoplay.
  • The instructions on your screen describe how to configure this setting. Click Properties to display the setting dialog.
  • Click Enabled, and choose CD-ROM drives, then click OK, to stop CD autoplay.
  • Start>Run>gpedit.msc>administrative Tamplete>system>Turn off autorun- properties>enable> all drive>ok

This setting does not prevent Autoplay for music CDs.